

Setting up a TradingView account is defined as the process of registering on TradingView.com to access its charting platform, technical analysis tools, and market data. The entire TradingView sign up process takes under 2 minutes and requires no credit card for the free plan. You can register using email, Google, Apple, or X, giving you four distinct paths to get started. Whether you are brand new to charts or a seasoned trader adding another tool to your workflow, this TradingView account setup guide covers every step from registration through interface configuration and common troubleshooting fixes.
What do you need before setting up a TradingView account?
Preparation takes less than five minutes. Having the right details ready prevents interruptions during the TradingView sign up process.
What to have ready before you start:
- A valid email address, or login credentials for Google, Apple, or X
- A unique username (3–20 characters, no spaces)
- A strong password if registering by email
- A confirmed decision on which device you will use first: web browser, desktop app, or mobile app
TradingView runs on web, desktop, and mobile, and all three sync automatically after account creation. You can start on a laptop and continue on your phone without reconfiguring anything.
Plan options at a glance:
| Plan | Charts per layout | Indicators per chart | Price |
|---|---|---|---|
| Basic (free) | 1 | 2 | $0 |
| Essential | 2 | 5 | Paid tier |
| Plus | 4 | 10 | Paid tier |
| Premium | 8 | 25 | Paid tier |
The free plan allows one chart and up to two indicators per chart. That is enough to learn price action, candlestick patterns, and basic technical analysis without spending anything. Start there and upgrade only when the limits actually slow you down.
Pro Tip: Register with an email address rather than a third-party login. Email registration gives you full control over your account and reduces login complications if you ever change your Google or Apple account.
How do you create and verify a TradingView account?
The step-by-step walkthrough below covers every click from the homepage to your first chart. Follow it in order and you will be logged in within two minutes.
-
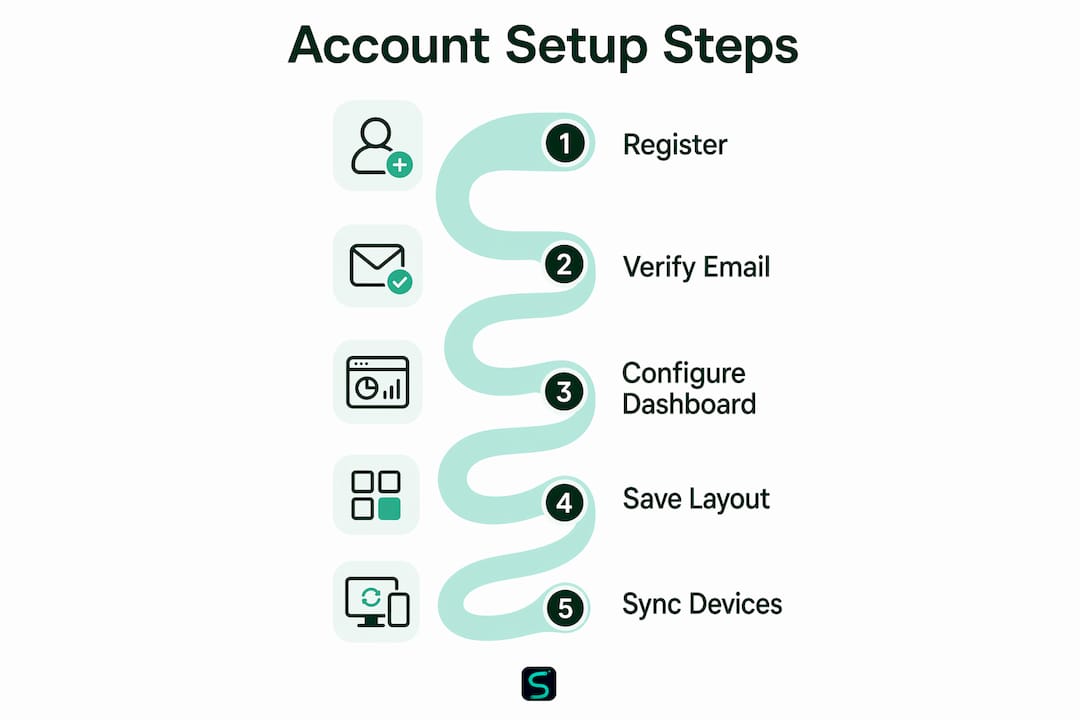
Go to TradingView.com. Open your browser and navigate to the homepage. Click the "Sign Up" button in the top right corner.
-
Choose your sign-up method. Select email, Google, Apple, or X. Each method creates a separate account, so pick one and stick with it to avoid duplicates later.
-
Enter your details. If using email, type your address, choose a username, and set a password. If using a third-party option, authorize the connection when prompted.
-
Verify your email. TradingView sends a confirmation link immediately. Clicking that link activates your account and unlocks full platform access. Skipping this step locks you out of key features.
-
Select the Basic plan. After verification, TradingView prompts you to choose a plan. Select Basic to start free. You can upgrade at any time from your account settings.
-
Log in and access the dashboard. Use your credentials to sign in. The main dashboard opens with a default chart, a watchlist panel on the left, and a toolbar across the top.
Pro Tip: Check your spam folder if the verification email does not arrive within two minutes. Add noreply@tradingview.com to your contacts so future alerts land in your inbox.
The dashboard layout can feel busy at first. Spend five minutes clicking each panel before touching any settings. Knowing where things live saves time when you start customizing.

How do you customize your TradingView interface after account setup?
Interface configuration is where most traders lose time. Getting the workspace right on day one means you spend less time adjusting and more time analyzing.
Five changes to make immediately after you log in:
- Switch to candlestick view. Click the chart type icon in the top toolbar and select "Candles." Candlestick charts show open, high, low, and close in one bar, which is the standard for technical analysis.
- Enable dark mode. Go to Settings > Appearance and toggle dark theme. Dark mode reduces eye strain during long sessions and makes price action easier to read against a dark background.
- Turn off grid lines. In Chart Settings > Canvas, uncheck "Vert grid lines" and "Horiz grid lines." A clean chart removes visual noise and keeps your focus on price.
- Set up a watchlist. Click the "+" icon in the watchlist panel and add the symbols you trade most. Grouping assets by category (crypto, forex, indices) speeds up your workflow.
- Save your layout. Click the floppy disk icon or press Ctrl+S (Cmd+S on Mac) after every session.
Layouts and custom settings sync automatically across web, desktop, and mobile. That means the chart you configure on your laptop appears exactly the same on your phone. This is one of TradingView's most practical features for traders who monitor markets from multiple locations.
Pro Tip: Create separate layouts for different asset classes. Name them clearly: "Crypto Scalping," "Forex Swing," or "Indices Daily." Switching between them takes one click and keeps your workspace organized.
For traders who want to go deeper on workspace configuration for short-term trading, the day trading indicator setup guide covers indicator placement and timeframe selection in detail.
What are the most common TradingView setup mistakes?
Most setup problems are avoidable. Knowing what trips up other traders saves you from repeating the same errors.
Common mistakes and how to fix them:
- Skipping email verification. Failing to verify your email blocks full access to the platform. Always complete this step before doing anything else.
- Creating duplicate accounts. Signing up with email once and then logging in with Google creates two separate accounts. Pick one method and use it every time.
- Not saving chart layouts. Many traders configure their charts, close the browser, and lose everything. Hit save after every session without exception.
- Hitting free plan limits too early. The free plan caps you at two indicators. If you add a third, TradingView removes the first. Know the limit before you build a complex setup.
- Ignoring cross-device sync. Cloud sync only works when you are logged in. If you open TradingView on a new device without signing in, you see a blank default chart, not your saved layout.
"Saving layouts ensures settings persist across desktop and mobile sessions, which is critical for active traders monitoring markets flexibly." This is not a nice-to-have feature. For traders who switch between devices mid-session, it is the difference between a functional workflow and starting from scratch every time.
When you are ready to move beyond the free plan, TradingView's paid tiers add multiple charts per layout, more indicators, and faster data refresh rates. Upgrade when the free plan's two-indicator limit actively restricts your analysis, not before.
Key Takeaways
Setting up a TradingView account correctly from the start, including email verification, layout saving, and interface configuration, prevents the most common mistakes that slow traders down.
| Point | Details |
|---|---|
| Sign-up takes under 2 minutes | Use email, Google, Apple, or X with no credit card required for the free plan. |
| Email registration is the safest option | It gives you full account control and avoids third-party login complications. |
| Verify your email immediately | Skipping verification blocks full platform access and is the top setup mistake. |
| Configure the interface on day one | Set candlestick view, dark mode, and no grid lines before you start analyzing. |
| Save layouts and enable cloud sync | Saved layouts persist across web, desktop, and mobile so you never lose your setup. |
Why I tell every new trader to start with the free plan
The instinct to upgrade immediately is understandable. Paid plans look impressive on the features page. But mastering basic charting before paying for premium is the right call, and here is why: the free plan forces discipline.
When you only have two indicators, you choose carefully. You learn what each one actually tells you instead of piling on five oscillators that all say the same thing. That constraint builds a stronger foundation than any premium feature can.
The cross-device sync point is one I cannot stress enough. I have watched traders spend 45 minutes rebuilding a chart setup because they forgot to save before closing the browser. Saving layouts and enabling cloud sync is a 10-second habit that protects hours of configuration work. Build that habit on day one.
On upgrades: the right time to pay for a higher tier is when a specific free plan limitation is costing you trades. If you need three indicators and the cap is stopping you, upgrade. If you just want more features without a clear use case, wait. The free plan is genuinely capable for learning price action, reading candlestick patterns, and building your first real trading system.
— Tran
Scalping-algo's premium indicators for your TradingView setup
Once your TradingView account is configured and you are comfortable reading charts, the next step is adding indicators that generate real signals.
Scalping-algo builds premium TradingView indicators in Pine Script v6, designed for crypto, forex, indices, and futures trading on lower timeframes (1m–15m). The indicators produce real-time, non-repainting buy and sell signals with built-in volatility gating and divergence detection. Every script is open-source and ships with native webhook alerts for Discord. The Scalping-algo indicator suite is built for traders who want institutional-grade tools without institutional overhead. If you are ready to move beyond basic charting, the Algo Master three-indicator system is the logical next step after your TradingView account setup is complete.
FAQ
How long does it take to create a TradingView account?
Creating a TradingView account takes under 2 minutes using email, Google, Apple, or X, with no credit card required for the free plan.
Do I need to verify my email to use TradingView?
Yes. Failing to click the confirmation link prevents full access to the platform, so complete email verification before doing anything else.
What does the TradingView free plan include?
The free plan provides one chart per layout and up to two indicators, which is sufficient for beginners learning price action and candlestick analysis.
Can I use TradingView on multiple devices?
Yes. After setting up your TradingView profile, layouts and settings sync automatically across web, desktop, and mobile as long as you are logged in to the same account.
When should I upgrade from the free TradingView plan?
Upgrade when a specific free plan limit, such as the two-indicator cap, is actively restricting your analysis. Experts recommend mastering basic charting on the free plan before paying for premium features.