

An order block indicator automatically maps institutional-origin price zones onto your chart as boxed areas, giving scalpers a structured basis for limit entries and rejection-based setups. These are not ordinary support/resistance lines. They mark the exact origin of a displacement move, where institutions accumulated or distributed positions before price broke structure.
Three things to know before you go further:
- Institutional logic: Order blocks represent accumulation or distribution zones. Price frequently returns to these origins to "mitigate" institutional drawdown before continuing.
- Tooling: The most practical implementations run on TradingView and are coded in Pine Script v6. Choose non-repainting, multi-timeframe overlays for scalping workflows.
- Confirmation required: A zone alone is not a trade. Confluence with a market structure shift or liquidity sweep is what separates high-probability setups from noise.
Key Takeaways
An order block indicator only produces an edge when zones are filtered by HTF alignment, FVG confluence, and structural confirmation — not traded in isolation.
| Point | Details |
|---|---|
| Check HTF bias first | Only take OB trades aligned with the Daily or 4H market structure direction. |
| Require confluence | A valid setup needs an OB tap plus FVG overlap or a market structure shift, not just a zone touch. |
| Verify non-repainting | Check Pine Script v6 source code for lookahead flags before trusting any indicator's historical signals. |
| Backtest with many events | Fewer events produce unreliable win-rate estimates; use event-based testing, not bar-slice testing. |
| Scalping-algo integration | Scalping-algo's suite combines non-repainting OB detection, HTF overlays, and webhook alerts in one TradingView-native package. |
Table of Contents
- What is an order block indicator and why does it differ from regular support/resistance?
- How do order block indicators detect and display zones?
- How do you recognize bullish vs. bearish order blocks on a chart?
- A strict execution checklist for order block trades
- How to configure an order block indicator in TradingView
- How to backtest an order block indicator and measure its edge
- Limitations and common misconceptions about order block indicators
- A step-by-step scalper trade using an order block indicator
- The case for transparency in order block tools
- Scalping-algo's order block tools for TradingView scalpers
- Sources
What is an order block indicator and why does it differ from regular support/resistance?
Standard support/resistance forms where price bounced multiple times. Order blocks are different: they mark the origin of a displacement, specifically the last opposing candle before an impulsive break of structure. That distinction matters because the zone is tied to institutional execution, not just a price memory.
Institutions cannot fill massive orders at a single price. They accumulate across a zone, and when price eventually returns to that origin, they defend their position. That defense is what scalpers are trying to trade. Capital describes these as zones reflecting institutional activity that often form after consolidation and signal potential entry or exit levels.
The connection to order flow and liquidity is direct. Before a clean displacement, institutions typically sweep liquidity (stop clusters above highs or below lows), then drive price away. That sweep-plus-displacement sequence is what separates a genuine order block from a random consolidation. Concepts like Break of Structure (BOS) and Change of Character (CHOCH) are the structural confirmation layer on top.
Pro Tip: Higher-timeframe order blocks (Daily, 4H) carry significantly more weight than 1m or 5m zones. When a scalper sees a Daily OB sitting on their 5m chart, that confluence is a stronger signal than any lower-timeframe zone alone. Always check the institutional order flow context before committing to a lower-TF entry.
How do order block indicators detect and display zones?
Detection logic varies across indicators, but the core methods are consistent:
- Last opposing candle before BOS: The algorithm scans back a defined number of bars, finds the final bearish candle before a bullish impulse that breaks structure (or vice versa), and draws a zone from that candle's range.
- Consolidation box + displacement: Some indicators box the consolidation range before an impulsive move, treating the entire base as the order block.
- Fair Value Gap (FVG) overlap: When an FVG sits immediately above or below the zone, it validates institutional involvement. High-quality indicators combine FVG detection, volume confirmation, and mitigation logic to reduce false-positive zones.
- Volume and ATR filters: An impulse that lacks volume or fails a minimum ATR multiplier threshold gets filtered out, reducing low-conviction zones.
Zone boundaries are drawn either as the full candle range (high to low) or body-only (open to close). Mitigation is defined as either a wick touch of the zone or a candle close beyond it. These two settings dramatically change how many zones remain active on your chart.
TradingView indicator implementations commonly add strength scores, FVG stars, and mitigation flags so you can rank zones at a glance rather than treating every box equally.
Pro Tip: Turn volume confirmation ON for stocks and crypto, where volume data is reliable. For forex pairs, volume data is tick-based and less meaningful — rely on ATR impulse filters and FVG overlap instead.
How do you recognize bullish vs. bearish order blocks on a chart?
Bullish order block: The last bearish candle before a clean bullish impulse that breaks a prior swing high. The zone sits below current price and represents a demand origin.
Bearish order block: The last bullish candle before a clean bearish impulse that breaks a prior swing low. The zone sits above current price and represents a supply origin.
Visual confirmation signals that raise conviction:
- An engulfing candle or strong close through the prior swing immediately after the OB candle
- An FVG directly above (bullish) or below (bearish) the zone
- A prior liquidity sweep (stop hunt) just before the displacement
- High relative volume on the displacement candle
Strike notes that higher-timeframe OBs are generally more reliable and that strong displacement with a structural break is a required condition, not optional.
Polarity flips and breaker blocks: When price closes fully through a bullish OB (not just wicks it), the zone loses its demand status and can flip to a supply zone, now called a breaker block. Treat converted breaker blocks differently from fresh OBs. For a deeper look at that distinction, the breaker blocks vs. order blocks guide on Scalping-algo covers the mechanics in detail.
A strict execution checklist for order block trades
Follow this sequence on every trade, without shortcuts:
- Establish HTF bias. Check the Daily or 4H chart. Are you in a bullish or bearish market structure? Only take OB trades in the direction of the HTF trend.
- Identify an unmitigated HTF order block. Mark the zone on your higher timeframe. Confirm it has not been touched since formation.
- Verify BOS and displacement. The OB must have been created by a genuine structural break with a strong impulse candle, not a slow grind.
- Wait for price to return (mitigation tap). Do not enter early. Wait for price to reach the proximal edge of the zone.
- Get lower-timeframe confirmation. On your 1m or 5m chart, look for a rejection candle, engulfing pattern, or CHOCH before entering.
- Execute and manage. Place your limit or market order. Stop goes at the distal edge. Target a minimum 1:2 risk-reward ratio.
Risk management rules to apply alongside this checklist:
- Risk no more than 1–2% of account equity per trade
- Set a daily max drawdown limit (e.g., 3–5%) and stop trading when hit
- Require at least 1:2 risk-reward before entering; 1:3 is preferable on scalping timeframes
- Apply a circuit breaker after three consecutive losses: step away and review
Pro Tip: Set proximity alerts in TradingView so the indicator fires a webhook notification when price approaches an unmitigated OB. Fast sessions move quickly — a webhook-connected Discord alert means you never miss a mitigation tap while away from the screen.
For limit vs. market order selection: use a limit order at the proximal edge when the zone is well-defined. Switch to a market order only when a strong confirmation candle has already closed and you need immediate fill.
How to configure an order block indicator in TradingView
Key parameters to check when you install any order block indicator on TradingView:
- OB search lookback (bars): Controls how far back the algorithm scans. Shorter lookbacks (50–100 bars) keep zones recent and relevant for scalping.
- Pivot length: Defines what counts as a swing high/low. Lower values catch more structures; higher values filter to major pivots only.
- Impulse size filter (ATR multiplier): Filters out weak displacement moves. Set between 1.0–2.0 ATR for scalping timeframes.
- Volume multiplier: Requires the displacement candle to exceed average volume by a set multiple. Useful for stocks and crypto.
- Zone rendering mode: Full range (high to low) vs. body-only (open to close). Body-only gives tighter zones and cleaner stops.
- Mitigation mode: Wick touch vs. candle close. Wick touch is more sensitive; candle close reduces false mitigations.
- HTF overlay toggles: Enable Daily and 4H OBs to display on your 1m–15m chart.
Recommended default timeframes for scalpers: 1m and 5m for entries, with 15m, 1H, and 4H OBs displayed as reference zones. For top TradingView scalping setups, combining the 5m entry chart with a 4H OB overlay is a common and effective stack.
Alert setup steps:
- Right-click the indicator on your chart and select "Add Alert."
- Set the condition to trigger when price enters an unmitigated OB zone.
- In the alert message, include the ticker, timeframe, zone direction, and zone boundaries.
- Paste your Discord or webhook URL into the "Webhook URL" field.
Pine Script v6 indicators use alert() calls with alert.freq_once_per_bar_close to prevent repeated fires on the same bar. To confirm non-repainting behavior, open the indicator's source code and check that historical zone calculations use only bar_index data available at that bar's close, with no lookahead on security() calls. The complete guide to non-repainting indicators explains exactly what to look for in the code.
Pro Tip: Test both mitigation modes on your target asset before going live. On EUR/USD 5m, wick-touch mitigation may produce twice as many signals as close-beyond, with a noticeably lower win rate. Run at least 100 historical events before deciding.
How to backtest an order block indicator and measure its edge
Follow this protocol before trading any OB indicator live:
- Define your universe: one asset, one timeframe, one set of indicator parameters.
- Identify all unmitigated OB events over your test period (minimum 6 months of data; tick data preferred for scalping TFs).
- For each event, record the hypothetical limit entry at the proximal edge, stop at the distal edge, and target at 1:2 or 1:3 R.
- Apply realistic slippage (0.5–1 tick for liquid futures; 1–2 pips for forex) and commissions.
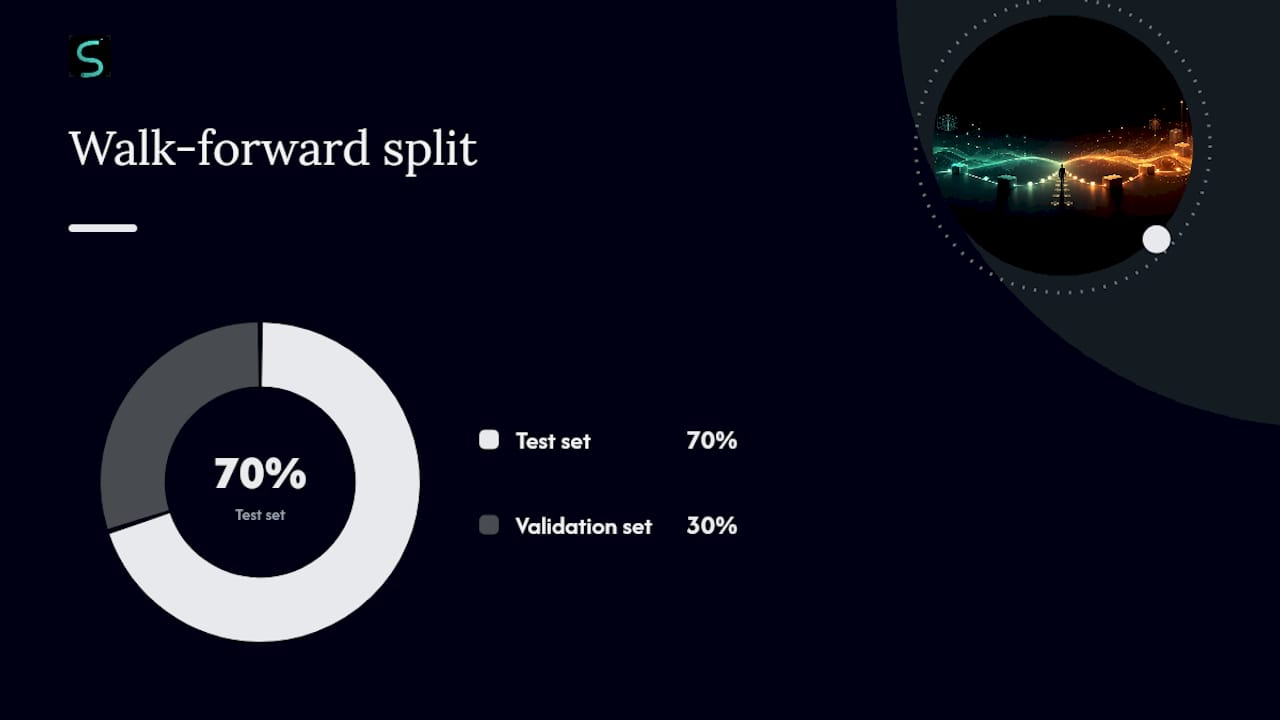
- Run walk-forward validation: test on the first 70% of data, validate on the remaining 30%.
Metrics to track for each test run:
| Metric | What it tells you |
|---|---|
| Sample size | Reliability — a substantial number of unmitigated OB events is generally recommended |
| Win rate | raw accuracy of the zone varies depending on filtering and market conditions |
| Average R | Profit per trade in risk units |
| Expectancy | (Win rate × avg win) minus (loss rate × avg loss); must be positive |
| Max drawdown | Worst peak-to-trough equity loss in the test period |
| Avg time in trade | Confirms the setup fits your scalping timeframe |
| Mitigation touch-to-failure ratio | How often price reaches the zone but fails to confirm |
Pro Tip: Use event-based testing, not bar-slice testing. Each unmitigated OB event is one data point. Bar-slice testing over-counts quiet periods and under-counts the actual signal frequency, giving a distorted picture of edge on scalping timeframes.
Tradingwizard supports this approach, describing unmitigated OBs as higher-probability magnets that reward waiting for the return rather than anticipating it.
Limitations and common misconceptions about order block indicators
- No guaranteed entries. CMC Markets explicitly warns that order blocks are points of interest, not guaranteed signals, and require disciplined stop-loss placement and trend alignment.
- False zones from low-volume moves. A structural break driven by thin liquidity (news spike, off-hours session) produces unreliable OBs.
- Timeframe mismatch. A 1m OB has little weight against a 4H trend. Always check the HTF context.
- Overfitting in backtests. Tuning parameters to maximize historical win rate on one asset produces results that rarely transfer to live trading.
- Slippage in fast markets. Limit orders at the proximal edge may not fill during high-volatility events; market orders carry wider spreads.
Myth: Order blocks work like passive support/resistance — just buy the zone and hold. They don't. They require active confluence: an OB tap plus a market structure shift or liquidity sweep, as ACY's institutional footprint analysis makes clear.
Non-repainting claims: Verify them in the source code. An indicator that redraws historical zones to show a cleaner backtrack is useless for live trading. Open the Pine Script editor, search for
security()calls, and confirm there is nolookahead=barmerge.lookahead_onargument. Open-source indicators let you do this check in seconds.
Pro Tip: Stack three filters before taking any OB trade: HTF alignment, FVG overlap on or adjacent to the zone, and a volume spike on the displacement candle. Removing any one of these filters typically increases signal count but lowers win rate significantly.
For a deeper look at buy/sell signal reliability and what non-repainting actually means in practice, that resource covers the verification steps clearly.
A step-by-step scalper trade using an order block indicator
Here is a realistic trade sequence on a 5m EUR/USD chart:
- HTF bias check (4H chart): Price is above the 4H 50 EMA, last BOS was bullish. Bias is long.
- Identify unmitigated HTF OB: A Daily bullish OB sits at 1.0820–1.0835. Price has not returned since formation three sessions ago.
- Wait for mitigation tap: On the 5m chart, price pulls back and touches 1.0832, the proximal edge of the Daily OB.
- Lower-timeframe confirmation: A 1m bullish engulfing candle closes at 1.0835 with above-average volume. CHOCH confirmed on 1m.
- Entry: Limit order placed at 1.0833. Stop at 1.0818 (distal edge, 15 pips). Target at 1.0863 (30 pips, 1:2 R).
- Management: Move stop to breakeven once price clears 1.0845. Let the trade run to target or trail stop by 10 pips.
Pro Tip: Abort the plan immediately if price closes below the distal edge before your confirmation candle forms, or if the zone has been touched twice without a clean rejection. Log every aborted setup in your trade journal — these are as valuable as completed trades for refining your intraday scalping workflow.
The case for transparency in order block tools
Order block indicators are only as trustworthy as the code behind them. At Scalping-algo, every indicator in the suite is built in Pine Script v6 with open-source code, so members can open the editor and verify the non-repainting logic directly. No black boxes.
The platform's backtesting dashboard gives members access to historical signal data, mitigation touch rates, and performance metrics across asset classes. Discord mentorship sessions let traders cross-check live setups against the indicator's zone logic in real time. Past backtest results are not a guarantee of future performance, and we say that plainly. What they do provide is a transparent starting point for building your own edge.
Scalping-algo's order block tools for TradingView scalpers
Scalping-algo gives you institutional-grade OB detection without the manual zone-drawing. The indicator suite includes non-repainting order block detection with FVG overlap flags, strength scoring, HTF overlay for Daily and 4H zones on intraday charts, and native webhook alerts that fire directly to Discord when price taps an unmitigated zone.
Getting started takes three steps: install the suite on TradingView, set your preferred timeframe stack (5m entries, 4H/Daily OB overlay), and connect your webhook URL for real-time alerts. The backtesting dashboard and educational academy are included with every membership. Pine Script v6 source code is open for inspection.
If you want the integrated setup — detection, alerts, backtesting, and mentorship in one place — explore the full indicator suite at Scalping-algo and choose the plan that fits your trading schedule.
Sources
These sources support the mechanics, configuration guidance, and risk principles covered above:
- Order block trading & institutional footprint — ACY
- Capital
- Strike
- Tradingwizard
- Order Block Finder DefinedEdge — TradingView