

1-minute scalping is a rule-based, high-frequency trading method that targets small, repeatable intraday moves on the M1 chart using a strict sequence: trend filter → controlled pullback → trigger candle → tight spread-aware stop → predefined exit. You hold each trade for seconds to a few minutes, targeting 3–10 pips in forex or the equivalent in ticks and points across futures and stocks. The edge is thin by design, which means execution quality, cost control, and rigid risk rules are not optional extras — they are the strategy.
Here is the core checklist before you place a single trade:
- Trend filter: Price above/below the 20 EMA and 50 EMA on the 5-minute chart confirms directional bias.
- Pullback: Price retraces to the EMA zone or a defined swing level on the 1-minute chart without breaking structure.
- Trigger candle: A momentum candle (engulfing, pin bar, or strong close) in the direction of the trend confirms entry.
- Stop placement: One tick/pip below the swing low (long) or above the swing high (short), plus a spread buffer.
- Take profit: Fixed 1R–1.5R, or the nearest micro-structure level, whichever comes first.
- Time stop: Exit any trade still open after 3–5 minutes if it has not moved in your favor.
- Daily cap: Stop trading after losing 2R–3R in a session.
Platforms you will need: TradingView for chart templates and indicator setup, Interactive Brokers (IBKR) or Thinkorswim (TD Ameritrade/Schwab) for direct-access execution, MetaTrader 4/5 for automation and backtesting, and Scalping-algo for a pre-built indicator suite with non-repainting signals and webhook alerts. The SEC's investor guidance is direct: day trading carries heightened risks, and realistic expectations are non-negotiable before you commit capital.
Key Takeaways
Effective 1-minute scalping requires a strict trend filter, spread-aware stops, predefined 1R targets, and a hard daily loss cap to keep the edge intact across a high-frequency session.
| Point | Details |
|---|---|
| Rule set is non-negotiable | Trend filter → pullback → trigger → stop → TP must be defined before the session opens. |
| Cost control determines viability | Total round-trip cost (spread + commission + slippage) must stay below 20% of your average target. |
| Risk per trade: 0.25%–0.5% | Conservative sizing at this range limits session drawdown even during losing streaks. |
| Backtest with realistic costs | Add spread and slippage to every simulated trade; run 100+ demo trades before going live. |
| Scalping-algo | Provides non-repainting M1 signals, volatility gating, webhook alerts, and a backtesting dashboard for the full M1 workflow. |
Table of Contents
- 1. The exact step-by-step 1-minute scalping rules (the M1 playbook)
- 2. How to set up your chart for 1-minute chart scalping
- 3. What your broker and platform must deliver for low-latency execution
- 4. Risk controls and position-sizing math for high-frequency scalping
- 5. How to backtest and practice your 1m scalping strategy before going live
- 6. Step-by-step trade walkthroughs across forex, futures, and stocks
- 7. Common mistakes that destroy M1 edges (and how to avoid them)
- 8. Why professional indicators and automation sharpen your M1 edge
- 9. When 1-minute scalping actually fits your trading profile
- Scalping-algo gives you a tested M1 setup, not a starting point
- Sources
1. The exact step-by-step 1-minute scalping rules (the M1 playbook)
A deterministic rule set is what separates a scalper from a gambler. Every trigger, stop, and exit must be defined before the session opens. According to TradeWinGuide's detailed M1 breakdown, a tight rule set with a trend filter, controlled pullback, and spread-aware stop placement measurably reduces false signals and helps preserve an edge over a large sample of trades.
Pre-trade filters
- Check the instrument: is it in a high-liquidity session? (London open, London/NY overlap, early NY session produce the tightest spreads and best follow-through.)
- Check the economic calendar. No entries within 5 minutes of a high-impact news release.
- Confirm the spread is within your threshold (see Section 5 for thresholds by instrument).
The sequential entry checklist
- Define the trend on the 5-minute chart. Price above both the 20 EMA and 50 EMA = bullish bias. Price below both = bearish bias. No trade if price is between the two EMAs.
- Wait for a pullback on the 1-minute chart. Price must retrace to the 20 EMA zone or a clear swing level without closing below the prior swing low (long) or above the prior swing high (short).
- Confirm the trigger candle. A bullish engulfing, pin bar, or strong-close candle at the EMA zone triggers a long. The candle must close, not just wick, in your direction.
- Enter on the open of the next candle using a limit or stop-limit order to control fill price.
- Place the stop-loss one tick/pip below the trigger candle's low (long) or above its high (short), plus a spread buffer. For EUR/USD: typically 3–5 pips total. For ES futures: 2–3 ticks below the swing low.
- Set the take-profit at 1R (same distance as your stop) or the nearest micro-structure resistance/support level, whichever is closer.
- Apply the time stop. If the trade has not moved 50% toward target within 3 minutes, close it at market.
Daily operating rules
- Maximum 10 trades per session.
- Stop trading after 3 consecutive losses.
- Hard daily loss limit: 2R–3R. When hit, close the platform.
Pro Tip: *Use hotkeys or bracket orders (OCO) to place your stop and target simultaneously at entry.
Worked example (EUR/USD)
- Entry: 1.0850 (long at EMA pullback)
- Stop: 1.0845 (5-pip stop, including 1-pip spread buffer)
- Target: 1.0855 (5-pip target = 1R)
- Result: Target hit in 2 minutes. Net: +4 pips after 1-pip spread.
2. How to set up your chart for 1-minute chart scalping
The goal is a clean, fast-loading layout with exactly the information you need and nothing else. Clutter costs you reaction time.
Recommended layout
- Primary pane: 1-minute chart with 20 EMA, 50 EMA, and VWAP anchored to the session open.
- Secondary pane (reference only): 5-minute chart with the same EMAs for trend bias.
- Oscillator pane: RSI (7-period) or Stochastic (5,3,3) for momentum confirmation. Keep it to one.
- Volume/tick pane (futures/indices): Tick volume or delta bars to confirm momentum on the trigger candle.
Exact indicator settings
| Indicator | Setting | Purpose |
|---|---|---|
| EMA Fast | 20-period | Pullback zone and dynamic support/resistance |
| EMA Slow | 50-period | Trend filter on 5m; secondary filter on 1m |
| VWAP | Session-anchored | Institutional bias; price above = bullish |
| RSI | 7-period | Oversold/overbought at pullback zone |
| ATR | 7-period | Volatility filter; avoid entries when ATR is below session average |
| Stochastic | 5,3,3 | Momentum cross confirmation at EMA zone |
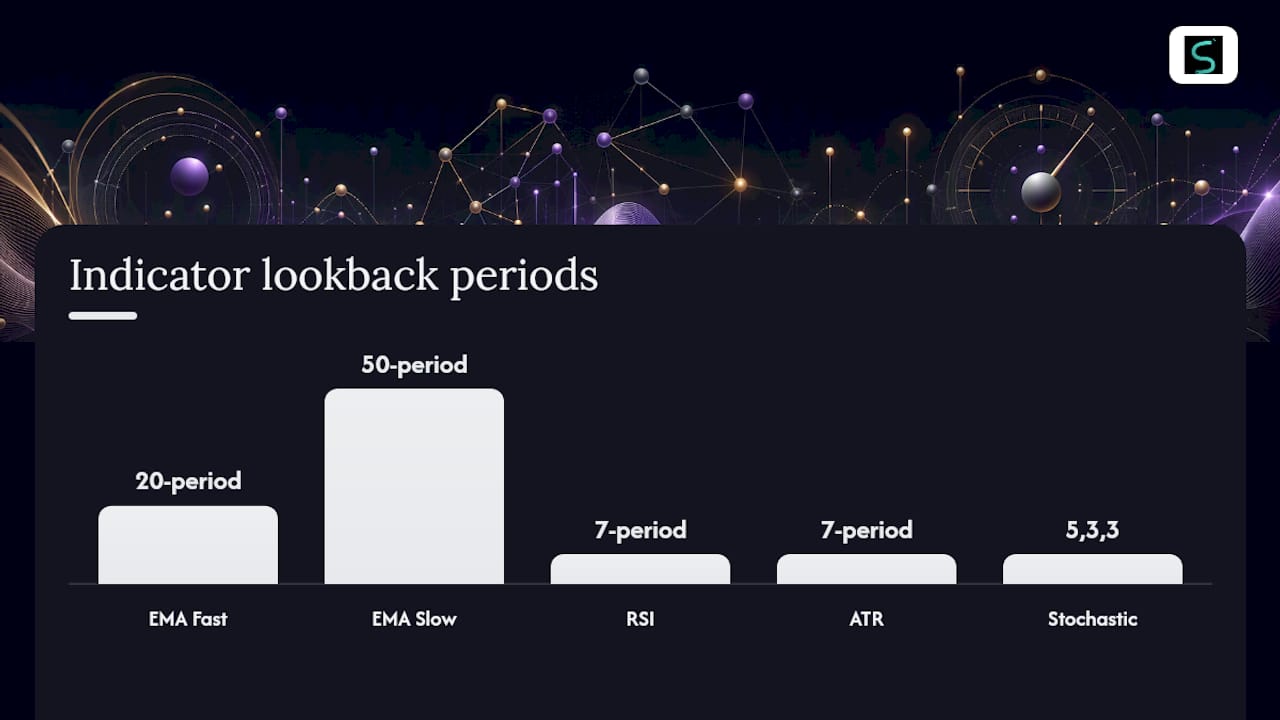
Admiral Markets' forex M1 guide recommends combining short EMAs with a momentum oscillator like Stochastic and always testing the combination on demo before going live — a point worth taking seriously.
Multi-timeframe confirmation without overfitting
Use the 5-minute chart for trend direction only. Never add a third timeframe to the entry decision — it creates analysis paralysis on a chart where you have 60 seconds per candle. The 1-minute chart handles entries and exits. The 5-minute chart answers one question: which direction?
TradingView template tips
Save your layout as a TradingView template after configuring all indicators. Export it via the "Save chart layout as default" option so it loads instantly on any instrument. Scalping-algo's TradingView indicator suite slots directly into this template structure, adding non-repainting signal overlays and volatility gates without cluttering the pane.
Visual hygiene checklist
- Remove all drawing tools from the toolbar except horizontal lines and trend lines.
- Set background to dark mode (reduces eye strain during fast sessions).
- Use keyboard shortcuts for timeframe switching (Alt+1 for 1m, Alt+5 for 5m in TradingView).
- Hide the watchlist panel during active trading to maximize chart space.
3. What your broker and platform must deliver for low-latency execution
Investopedia's scalping overview puts it plainly: scalping requires high liquidity, tight spreads, fast execution, and often automation. Without those conditions, transaction costs and slippage eliminate expected profits before you even get started.
Minimum broker requirements
- Raw or ECN-style spreads (not market-maker fixed spreads).
- Direct market access (DMA) or direct-access routing.
- Commission structure that keeps total round-trip cost below 20% of your average target.
- Real-time Level 1 data at minimum; Level 2 for futures and stocks.
- No requotes or significant order rejection rates.
Platform features that matter
- Hotkeys: One-key entry, stop adjustment, and close. Non-negotiable.
- Bracket/OCO orders: Place stop and target simultaneously at entry.
- Stop-limit orders: Avoid market-order slippage on entries.
- API/webhook support: Enables automated order placement from TradingView alerts.
- Fast order modification: You need to move a stop in under two seconds.
Platform pairing guide
- TradingView + IBKR: TradingView handles charting and alerts; IBKR's TWS handles execution via the broker integration. Tight spreads and direct access on forex and equities.
- Thinkorswim (TD Ameritrade/Schwab): All-in-one platform with built-in hotkeys, bracket orders, and excellent futures data. Strong for equities and index futures.
- MetaTrader 4/5: Best for automated strategy execution via Expert Advisors (EAs) and backtesting. Widely available for forex brokers with ECN accounts.
Pro Tip: Before going live, simulate execution slippage in your backtests by adding 0.5–1 pip (forex) or 1 tick (futures) to every entry and exit. If the strategy stops being profitable with that buffer, the edge is too thin for live conditions.
Slippage and spread tactics
- Use stop-limit orders for entries, not pure stop orders, to cap fill price.
- Pre-calculate your spread buffer for each instrument and add it to your stop distance.
- Avoid trading the first 2 minutes after a major news release — spreads widen sharply and fills become unpredictable.
4. Risk controls and position-sizing math for high-frequency scalping
FINRA's day-trading guidance underscores that retail traders must actively manage capital, margin, and behavioral risks when trading frequently. On the 1-minute chart, where you might take 5–10 trades per session, those risks compound fast.
Position-sizing formula
The fixed-fractional method keeps risk consistent regardless of stop distance:
Position size = (Account × Risk %) ÷ Stop distance in dollars
- Risk amount: $50,000 × 0.0025 = $125
- Stop in dollars: 5 pips × $10 = $50 per standard lot
- Position size: $125 ÷ $50 = 2.5 mini lots (0.25 standard lots)
Recommended risk ranges
| Trader Type | Risk Per Trade | Daily Loss Limit |
|---|---|---|
| Beginner (learning phase) | 0.25% | 1.5R (3 trades at 0.5R) |
| Intermediate (consistent demo results) | 0.25%–0.5% | 2R |
| Experienced (live, proven edge) | 0.5%–1% | 3R |
How spread and commission change effective risk
When your spread is 1.5 pips and your stop is 5 pips, your effective stop is 6.5 pips from the moment you enter. That changes your position size calculation. Always use the spread-adjusted stop distance in your sizing formula, not the raw chart distance.
Behavioral guardrails
- Write your daily loss limit on a sticky note next to your monitor. When you hit it, close the platform.
- No revenge trading. A loss is data. A revenge trade is a second loss with no setup.
- After 3 consecutive losses, take a 15-minute break before re-evaluating.
- Track your emotional state in your trade journal alongside the technical data.
Warning: Overtrading is the single most common account-killer in M1 scalping. More trades do not mean more profit — they mean more exposure to spread costs and emotional decision-making. Quality over quantity, every session.
5. How to backtest and practice your 1m scalping strategy before going live
Backtesting a 1-minute strategy requires more care than higher-timeframe testing. The data resolution matters, the cost model matters, and the sample size needs to be large enough to be statistically meaningful.
Step-by-step backtest workflow
- Code the rule set. Use TradingView's Pine Script or MetaTrader's MQL4/5 to define every rule exactly as written in your playbook. No discretionary elements.
- Collect quality data. Use tick data or 1-second OHLC data where possible. Standard 1-minute OHLC data can introduce look-ahead bias on entries and exits within the candle.
- Set a realistic cost model. Add spread + commission + slippage to every trade. For EUR/USD: 1.5-pip spread + 0.5-pip slippage = 2-pip round-trip cost minimum.
- Run a walk-forward split. Use 70% of your data for optimization, 30% for out-of-sample validation. Never optimize on the full dataset.
- Run sensitivity checks. Shift your EMA settings by ±2 periods and your stop by ±1 pip. If results collapse, the edge is fragile.
- Run a Monte Carlo reshuffle. Randomly reorder your trade outcomes 1,000 times to see the range of probable equity curves for your win rate and R distribution.
Pro Tip: *Monte Carlo reshuffles reveal your worst-case drawdown scenario — not just the historical one.
Metrics to track
| Metric | Target Range | Notes |
|---|---|---|
| Win rate | 40% to 60% | Lower is viable with R > 1.5 |
| Average R | 1 to 1.5 | Net of costs |
| Expectancy | > 0.25R per trade | Below this, edge is marginal |
| Max drawdown | < 10% of account | Adjust sizing if exceeded |
| Trades per day | 5–10 | More = higher cost drag |
| Slippage impact | < 15% of avg target | If higher, reduce frequency |
Demo-forward testing protocol
Complete at minimum 100 demo trades before moving to live capital. Keep a detailed trade journal recording entry reason, stop distance, result in R, and any execution issues. After 100 trades, calculate your expectancy.
Admiral Markets recommends testing on demo before going live — and that applies to indicator-based setups just as much as manual rule sets.
6. Step-by-step trade walkthroughs across forex, futures, and stocks
Seeing the rules applied to real instrument conditions is where the playbook becomes concrete. Each asset class has different tick sizes, spread costs, and liquidity profiles that change how you size and manage trades.
Forex: EUR/USD long scalp
- Session: London/NY overlap, 9:15 AM ET
- 5m trend: Price above 20 EMA and 50 EMA. Bullish bias confirmed.
- 1m pullback: Price retraces to the 20 EMA zone over 3 candles. RSI dips to 38.
- Trigger candle: Bullish engulfing candle closes at the 20 EMA. Stochastic crosses up from oversold.
- Entry: 1.08520 (open of next candle)
- Stop: 1.08475 (4.5-pip stop including 1-pip spread buffer)
- Target: 1.08565 (4.5-pip target = 1R)
- Result: Target hit in 90 seconds. Net: +3.5 pips after spread.
Admiral Markets' forex M1 guide confirms this EMA + Stochastic combination as one of the most tested M1 forex setups, with demo testing recommended before committing live capital.
Futures: ES (S&P 500 E-mini) scalp
- Session: 9:35 AM ET (5 minutes after open, past the initial volatility spike)
- 5m trend: Price above VWAP and 20 EMA. Bullish.
- 1m pullback: Price pulls back to VWAP on declining volume over 2 candles.
- Trigger candle: Strong bullish close on above-average tick volume at VWAP.
- Entry: 5,420.25 (stop-limit order)
- Stop: 5,419.00 (5 ticks = $62.50 per contract)
- Target: 5,421.50 (5 ticks = $62.50 per contract = 1R)
- Commission: ~$4.50 round trip per contract (typical at IBKR or Thinkorswim)
- Net per contract: $62.50 minus $4.50 = $58.00
Limit entries at structure are mandatory here.
Stock: AAPL opening momentum scalp
- Session: 9:32 AM ET (2 minutes after open)
- Setup: AAPL gapping up, price above pre-market VWAP, 1m trend bullish
- Pullback: First 1-minute pullback candle to the 20 EMA after the gap
- Entry: $213.50 (limit order at EMA)
- Stop: $213.20 (30-cent stop, spread-aware)
- Target: $213.80 (30-cent target = 1R)
- Spread note: AAPL typically trades with a 1-cent spread at open, so spread cost is negligible relative to a 30-cent target.
Key execution insight: On stocks, the opening 2 minutes carry the widest spreads and most erratic fills. Waiting until the 9:32–9:33 candle closes before entering gives you a cleaner trigger and a more reliable stop level — you sacrifice a few cents of potential profit for a much higher-quality fill.
The FXOpen M1 strategy roundup reinforces the point: execution speed and clarity matter more than indicator complexity across all these setups. Pick one approach, know it cold, and execute it consistently.
7. Common mistakes that destroy M1 edges (and how to avoid them)
Most traders who fail at 1-minute scalping do not fail because the strategy is wrong. They fail because of operational and behavioral errors that compound over a high-frequency session.
The do-not-do checklist
- Trading during low-liquidity sessions. Asian session on EUR/USD, mid-afternoon doldrums on US equities — spreads widen and follow-through disappears. Stick to the London open, London/NY overlap, and early NY session.
- Ignoring spread and commission. A 3-pip target with a 2-pip spread is a 67% cost-to-target ratio. The edge does not survive that math. Pre-calculate your minimum viable target for each instrument before the session.
- Overleveraging. Using 2%+ risk per trade on a 10-trade session means a 6-loss streak wipes 12% of your account. Size down.
- Moving stops to breakeven too early. Moving a stop to breakeven after 1 pip of movement on a 5-pip target almost guarantees a scratch trade. Let the trade breathe to at least 50% of target before adjusting.
- Revenge trading. After a loss, the next trade must meet all entry criteria. If it does not, there is no trade.
- Ignoring scheduled news. A surprise CPI print or Fed statement can move EUR/USD 30 pips in 10 seconds. Check the economic calendar before every session.
- Using repainting indicators. An indicator that redraws past signals looks perfect in hindsight and fails in real time. Verify non-repainting behavior before trusting any signal tool.
- Platform lag and disconnected data feeds. A 2-second data delay on a 1-minute chart is a full candle of information you are missing. Test your data feed latency before live trading.
- Improper chart templates. Loading the wrong indicator settings or timeframe by mistake costs you the first 5 minutes of a session. Save and name templates precisely.
- Overcomplicating the setup. FXOpen's analysis of multiple M1 approaches confirms that execution speed and clarity consistently outperform indicator complexity. Two indicators used well beat six used poorly.
When not to scalp
Avoid M1 scalping during: the first 2 minutes after market open (erratic fills), the 30 minutes surrounding a high-impact news release, low-volume pre-holiday sessions, and any period when your broker's spread exceeds 2× its normal level.
8. Why professional indicators and automation sharpen your M1 edge
Manual execution on a 1-minute chart is hard. You have 60 seconds per candle, and the difference between a good fill and a bad one is often measured in seconds. Professional-grade indicators and automation reduce that human latency and filter out the noise that causes false entries.
What non-repainting, volatility-gated indicators add
A repainting indicator shows you a signal that disappears or moves after the candle closes — useless for live trading and actively misleading in backtests. Non-repainting signals lock in at candle close and stay fixed. Volatility gating adds a second filter: the indicator only fires when ATR or a similar measure confirms the market is moving enough to justify a trade. That alone eliminates a large portion of low-quality signals during choppy, low-range sessions.
Confluence tools go further. Multi-timeframe confirmation checks that the 5-minute trend aligns with the 1-minute entry. Divergence detection flags when momentum is weakening before a reversal. Order-block detection identifies institutional supply/demand zones where pullbacks are more likely to hold.
Automation and webhook integration
TradeWinGuide's M1 analysis highlights that automation reduces human reaction time and emotional exits — both critical when targets are measured in pips and ticks. TradingView's webhook alert system can trigger order placement directly through a broker's API, removing the manual click entirely. That integration is available through platforms like IBKR, MetaTrader 4/5, and compatible brokers.
The algorithmic scalping workflow follows a clear path: TradingView fires an alert when signal conditions are met → webhook sends the order parameters to the broker API → bracket order (stop + target) is placed automatically. You monitor, you do not click.
The practical case for automation: On a 5-pip target, a 1-second delay in manual order entry can mean a 1-pip worse fill. Across 200 trades, that is 200 pips of unnecessary cost — more than enough to turn a profitable edge into a losing one.
How Scalping-algo fits the playbook
Scalping-algo's indicator suite is built specifically for this workflow. Key features that map directly to the M1 rulebook:
- Non-repainting buy/sell signals on the 1-minute chart, built in Pine Script v6.
- Volatility gating that suppresses signals during low-ATR, choppy conditions.
- Multi-timeframe confluence overlay confirming 5-minute trend alignment.
- Divergence and order-block detection for higher-probability pullback entries.
- Projected TP/SL levels calculated from current volatility, not fixed pips.
- Native Discord webhook alerts for real-time signal delivery.
- Backtesting dashboard to measure signal quality on your specific instrument and session.
9. When 1-minute scalping actually fits your trading profile
Not every trader should be on the 1-minute chart. The method is demanding in ways that go beyond strategy rules.
It fits you if you can watch screens for a focused 1–3 hour session without distraction, have access to a low-cost execution environment (ECN broker, direct access, tight spreads), and can follow a rule set without improvising under pressure. The mental load is real. You are making entry and exit decisions every few minutes, managing open risk, and tracking session P&L simultaneously. Discipline is not a soft skill here — it is the strategy.
There is no shame in that. The 5-minute or 15-minute chart produces cleaner setups, lower costs per trade, and less emotional wear. The scalping timeframe selection guide covers this tradeoff in detail.
The learning curve is steeper than most traders expect. The first 100 demo trades will feel mechanical and slow. That is correct. Speed comes after the rules are automatic, not before. Rushing to live capital before the rules are internalized is the most expensive mistake a new scalper makes.
Scalping-algo gives you a tested M1 setup, not a starting point
Most traders spend weeks building a 1-minute chart template from scratch, only to discover their indicators repaint or their signals fire in the wrong conditions. Scalping-algo skips that process entirely.
The platform's premium TradingView indicator suite delivers non-repainting M1 signals with built-in volatility gating, multi-timeframe confluence, and projected TP/SL levels calibrated to current market conditions. Webhook alerts push signals directly to Discord in real time, so you are never waiting on a manual check. The backtesting dashboard lets you measure signal quality on your specific instrument and session before risking a dollar. And the Discord community gives you live mentorship and trade sessions alongside the tools.
Before buying any paid indicator suite, check for:
- Non-repainting confirmation (ask for a live demo, not a backtest screenshot).
- Transparent backtesting results with spread and commission included.
- Webhook/API support for automated order placement.
- Spread-aware TP/SL calculation, not fixed-pip targets.
- Active support and community access.
Scalping-algo checks every one of those boxes. Explore the full indicator suite and see how it maps to the playbook in this article — or go straight to the Algo Master 3-indicator system for an integrated setup with templates and example workflows included.
Sources
These resources cover regulatory context, strategy theory, indicator examples, and platform documentation for deeper study:
- Sec
- Scalping Strategies: Mastering Quick Profits in the Market
- Finra
- 1-Minute Scalping Strategy: M1 Rules, Entries, Exits | TradeWinGuide
- Forex Scalping Strategy Guide: Trading the 1-Minute Chart
- Four Popular 1-Minute Scalping Strategies in 2026 | Market Pulse
This article is general information, not a substitute for advice from a qualified financial advisor. Consult a qualified financial professional about your own circumstances before acting on anything here.